
Recently, while building a collaborative drawing web application with WebSocket for one of my livestreams, I discovered just how efficient it is to document a WebSocket server using the AsyncAPI specification in a spec-first approach. But what exactly do I mean by “spec-first”?
The spec-first API development approach involves designing the API using an API specification before implementing it. This method offers significant advantages, such as reducing the time needed to build the actual API, improving communication with stakeholders, and producing higher-quality APIs overall. But let’s save the deep dive into spec-first for another time and get back on track!
Why WebSocket and AsyncAPI Instead of OpenAPI?
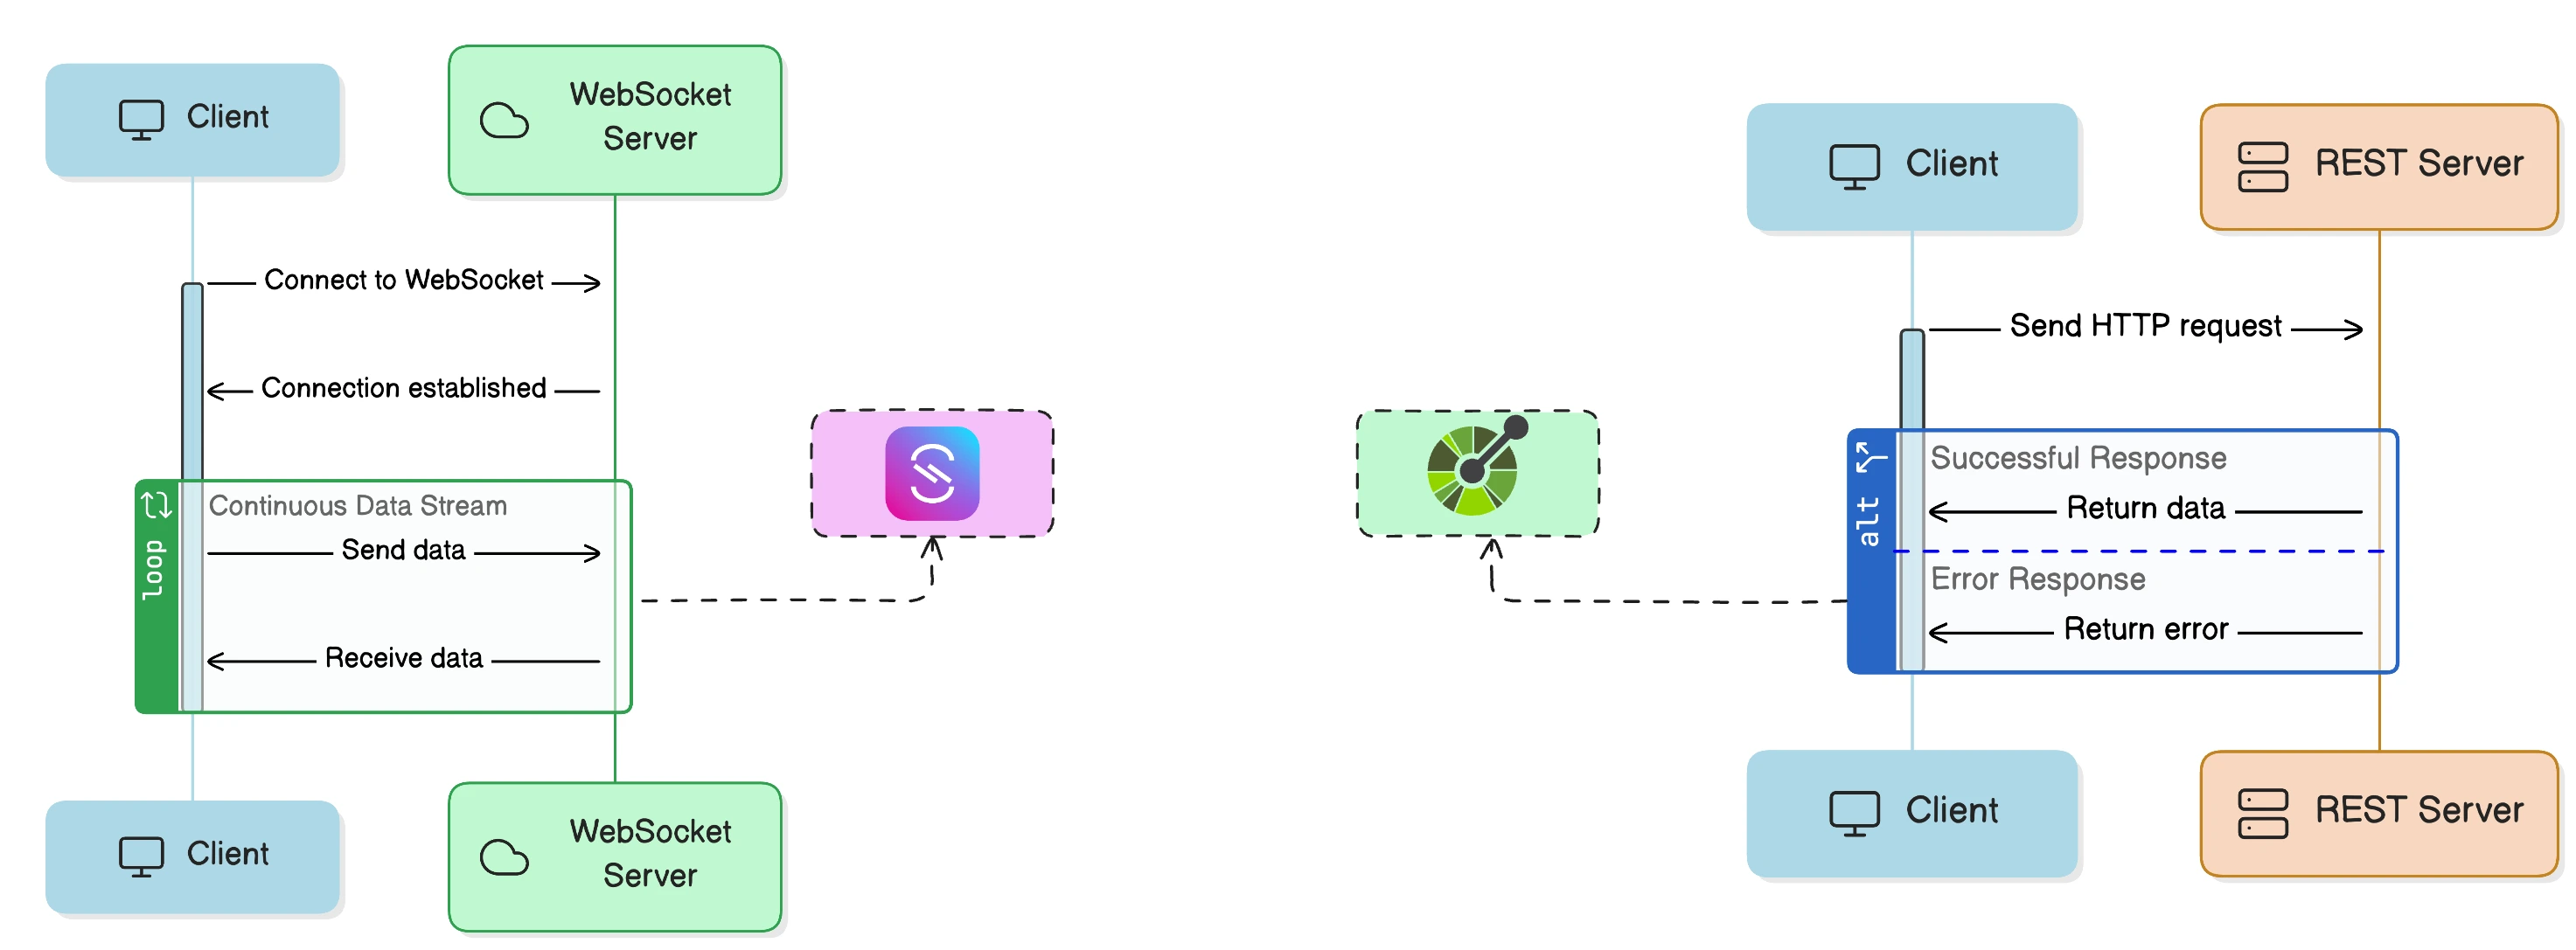
OpenAPI isn’t ideal for my use case because it’s specifically designed for REST APIs. WebSocket, on the other hand, differs significantly from traditional HTTP. It provides a two-way communication channel over a single Transmission Control Protocol (TCP) connection, which OpenAPI doesn’t support.
In simpler terms, unlike REST APIs, where you must send a request to receive a response, maintaining a connection similar to a WebSocket would require repeatedly pinging the server at intervals (a process known as polling). WebSocket does the opposite. It keeps the connection open between server and client, allowing the server to send data to the client without waiting for a request.
So, why would I use OpenAPI for that? Now you see why AsyncAPI is the better fit. Since WebSocket enables an event-driven connection between client and server, we need an API specification that supports this kind of interaction, and that’s where AsyncAPI comes in.
Let’s explore why combining AsyncAPI with WebSocket is such a powerful approach.
The Intersection
As I mentioned earlier, WebSocket enables an event-driven connection between client and server, meaning it operates asynchronously. AsyncAPI offers a standardized way to define these asynchronous APIs, making it a perfect match. This combination enhances real-time application development by ensuring consistent, reliable message formats and enabling instant, bidirectional data exchange between client and server.
Now, let’s dive deeper into this powerful intersection!
Clear and Concise Message Format and Event Types
Defining your WebSocket API with AsyncAPI allows you to leverage AsyncAPI's schema definitions, ensuring a structured and consistent approach to handling data exchange across WebSocket connections. This reduces misunderstandings about message formats and event types, creating a smoother, more reliable communication flow.
Consider a real-world example from a chat application. Here's how you'd define a message schema in AsyncAPI:
1components:
2  messages:
3    chatMessage:
4      name: ChatMessage
5      title: Chat Message
6      summary: A user message sent in the chat
7      description: Represents a message exchanged between users in a real-time chat application
8      payload:
9        type: object
10        properties:
11          messageId:
12            type: string
13            format: uuid
14            description: Unique identifier for this message
15          senderId:
16            type: string
17            description: ID of the user sending the message
18          senderName:
19            type: string
20            description: Display name of the sender
21          content:
22            type: string
23            maxLength: 1000
24            description: The actual message text
25          timestamp:
26            type: string
27            format: date-time
28            description: When the message was sent
29        required:
30          - messageId
31          - senderId
32          - senderName
33          - content
34          - timestamp
Notice how each field has a clear purpose, defined type, and specific constraints. This structured approach prevents confusion about what data should be in each message and how it should be formatted, something that would be much harder to maintain without a specification.
Message Schema Validation
AsyncAPI allows your WebSocket API to validate real-time messages against predefined schemas at runtime, helping to catch errors early in the development stage. With the production-ready AsyncAPI Validator, you can automatically validate your WebSocket messages against your AsyncAPI document.
However, there's an important detail: by default, JSON Schema (which AsyncAPI uses under the hood) allows additional properties. This means the validator would reject the chatMessage above if a required field is missing, but it would accept a message with extra properties not defined in your schema.
To prevent unexpected properties from slipping through, add additionalProperties: false to your message payload:
1payload:
2  type: object
3  properties:
4    messageId:
5      type: string
6      format: uuid
7    # ... other properties
8  required:
9    - messageId
10    - senderId
11    - senderName
12    - content
13    - timestamp
14  additionalProperties: false
Now your validator enforces that only the properties you've defined are accepted, ensuring strict schema compliance across your system.
Improved Architectural Planning
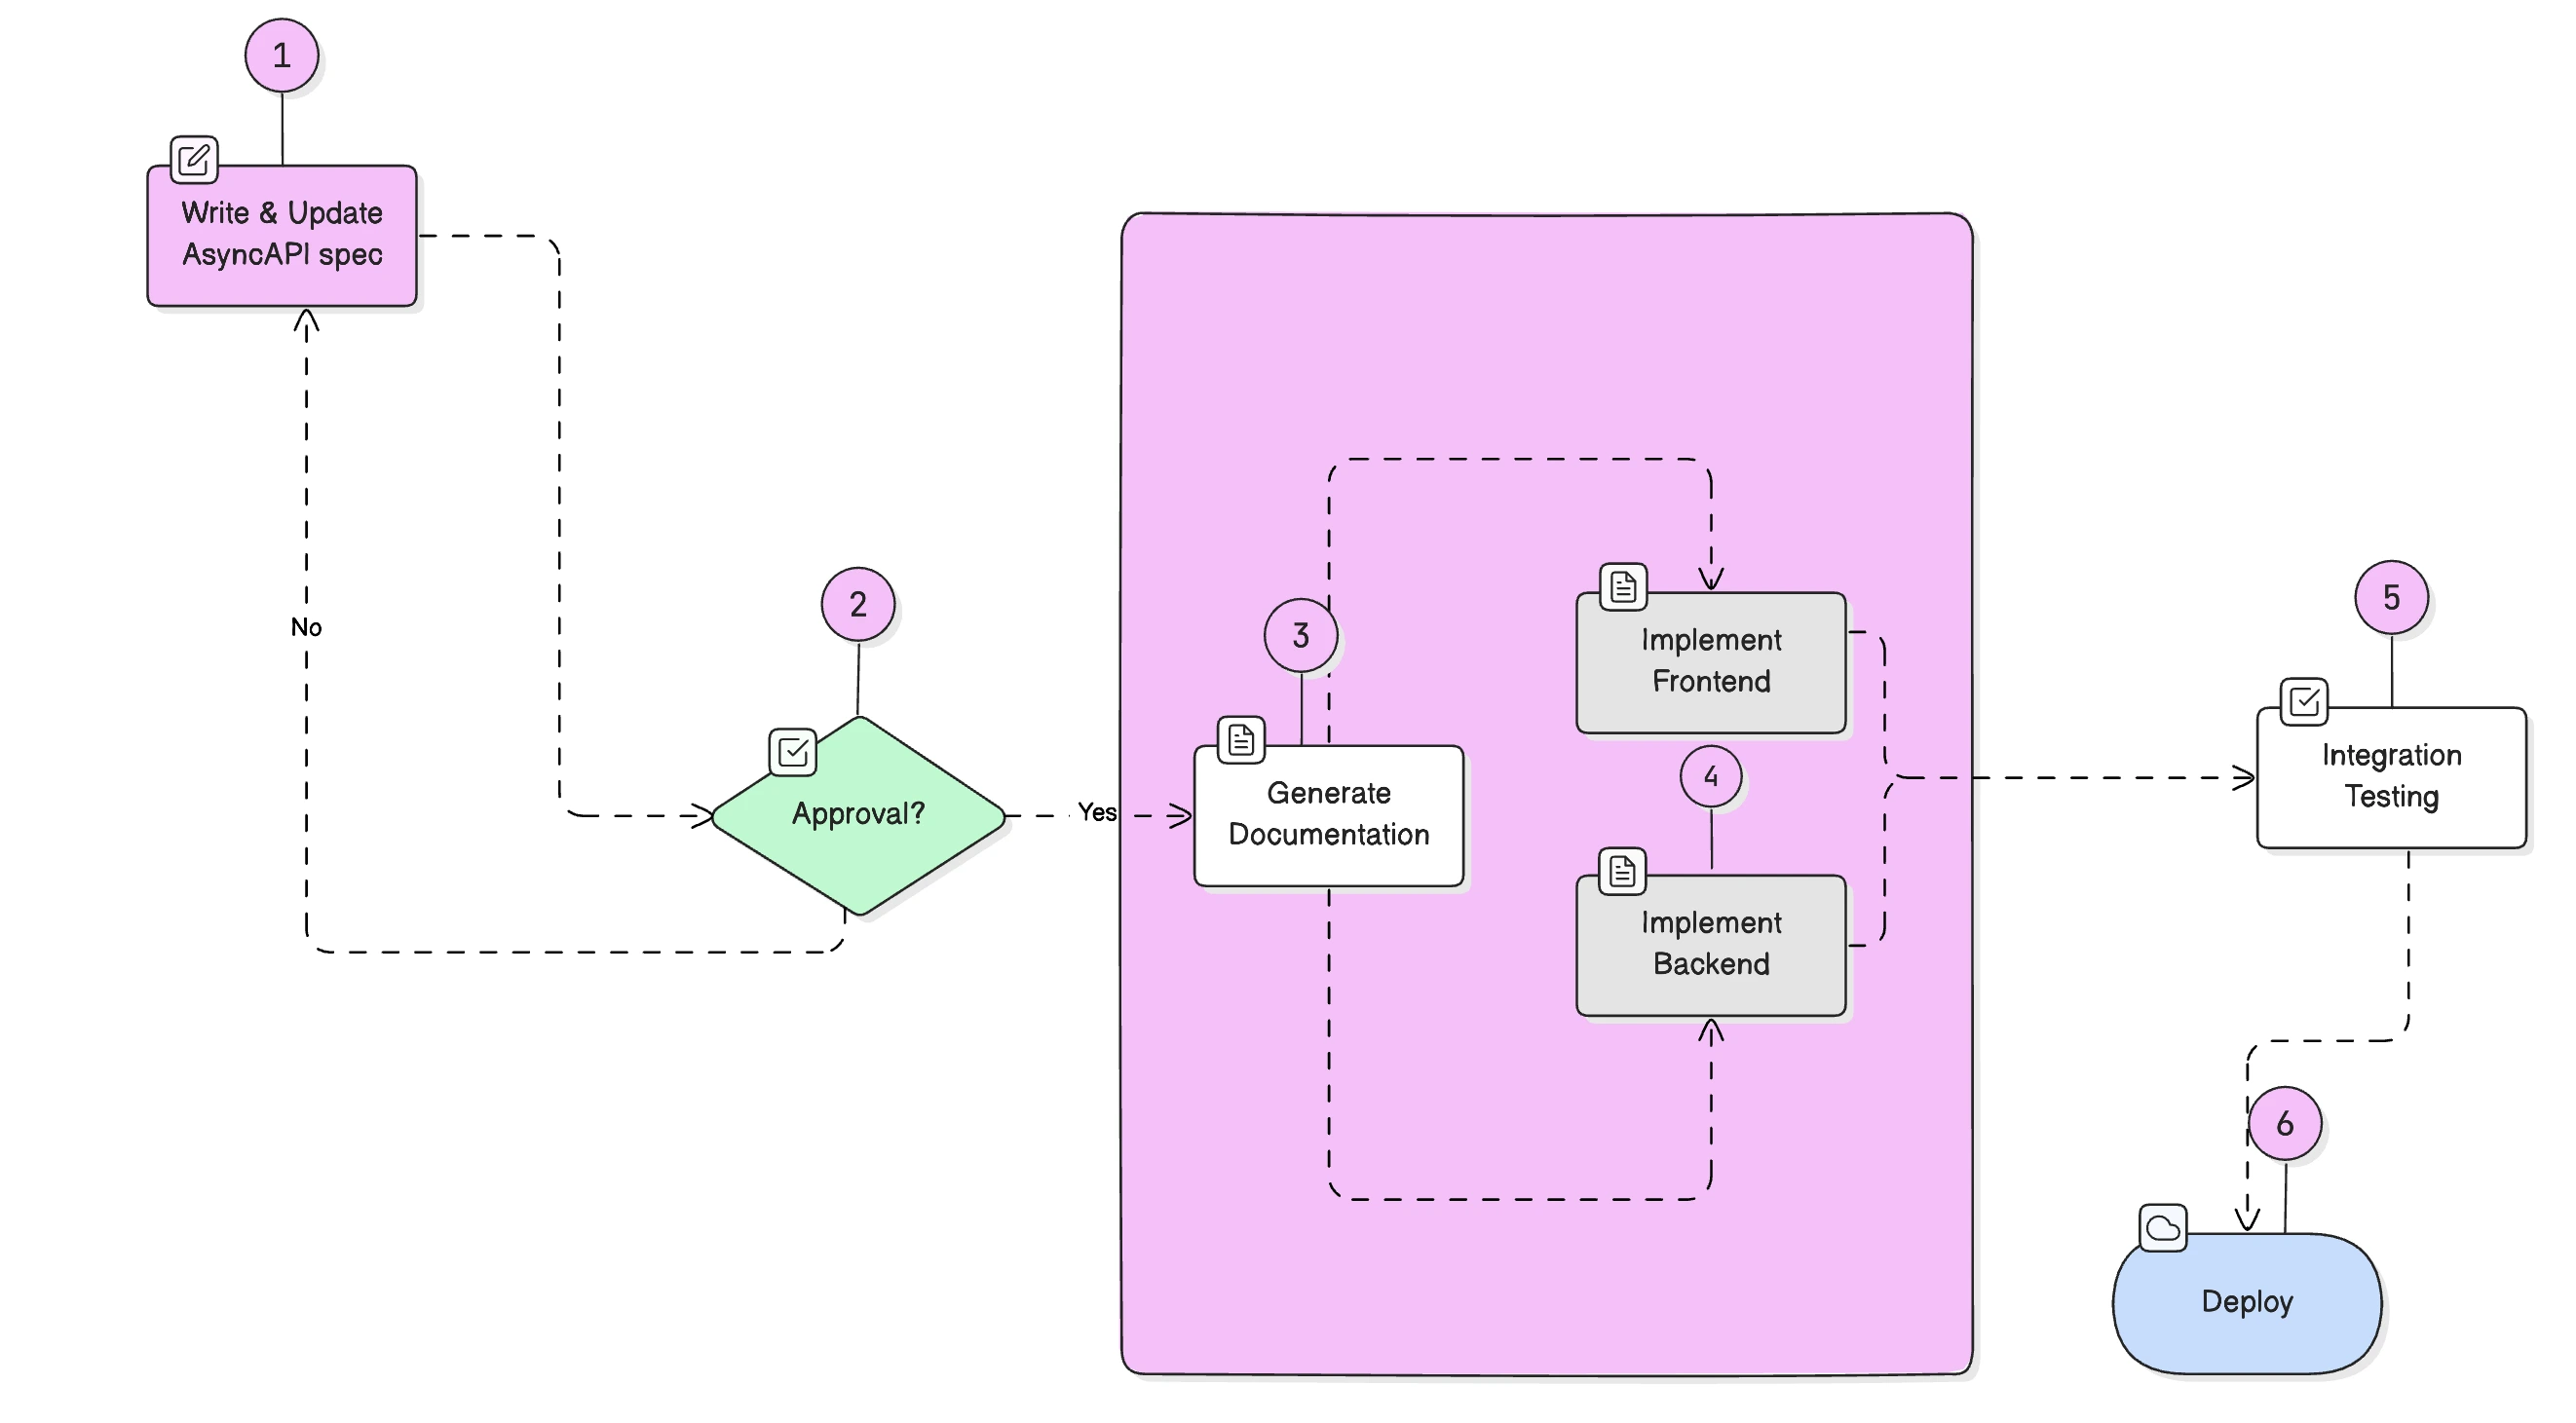
Using AsyncAPI with your WebSocket API supports a spec-first approach where your AsyncAPI document becomes the single source of truth. Both your client and server implementations derive from this specification, ensuring they never drift apart.
Rather than treating your specification as an afterthought to satisfy documentation requirements, it becomes the foundation for how you build your API. This enables faster prototyping, testing, and implementation, significantly reducing time to market.
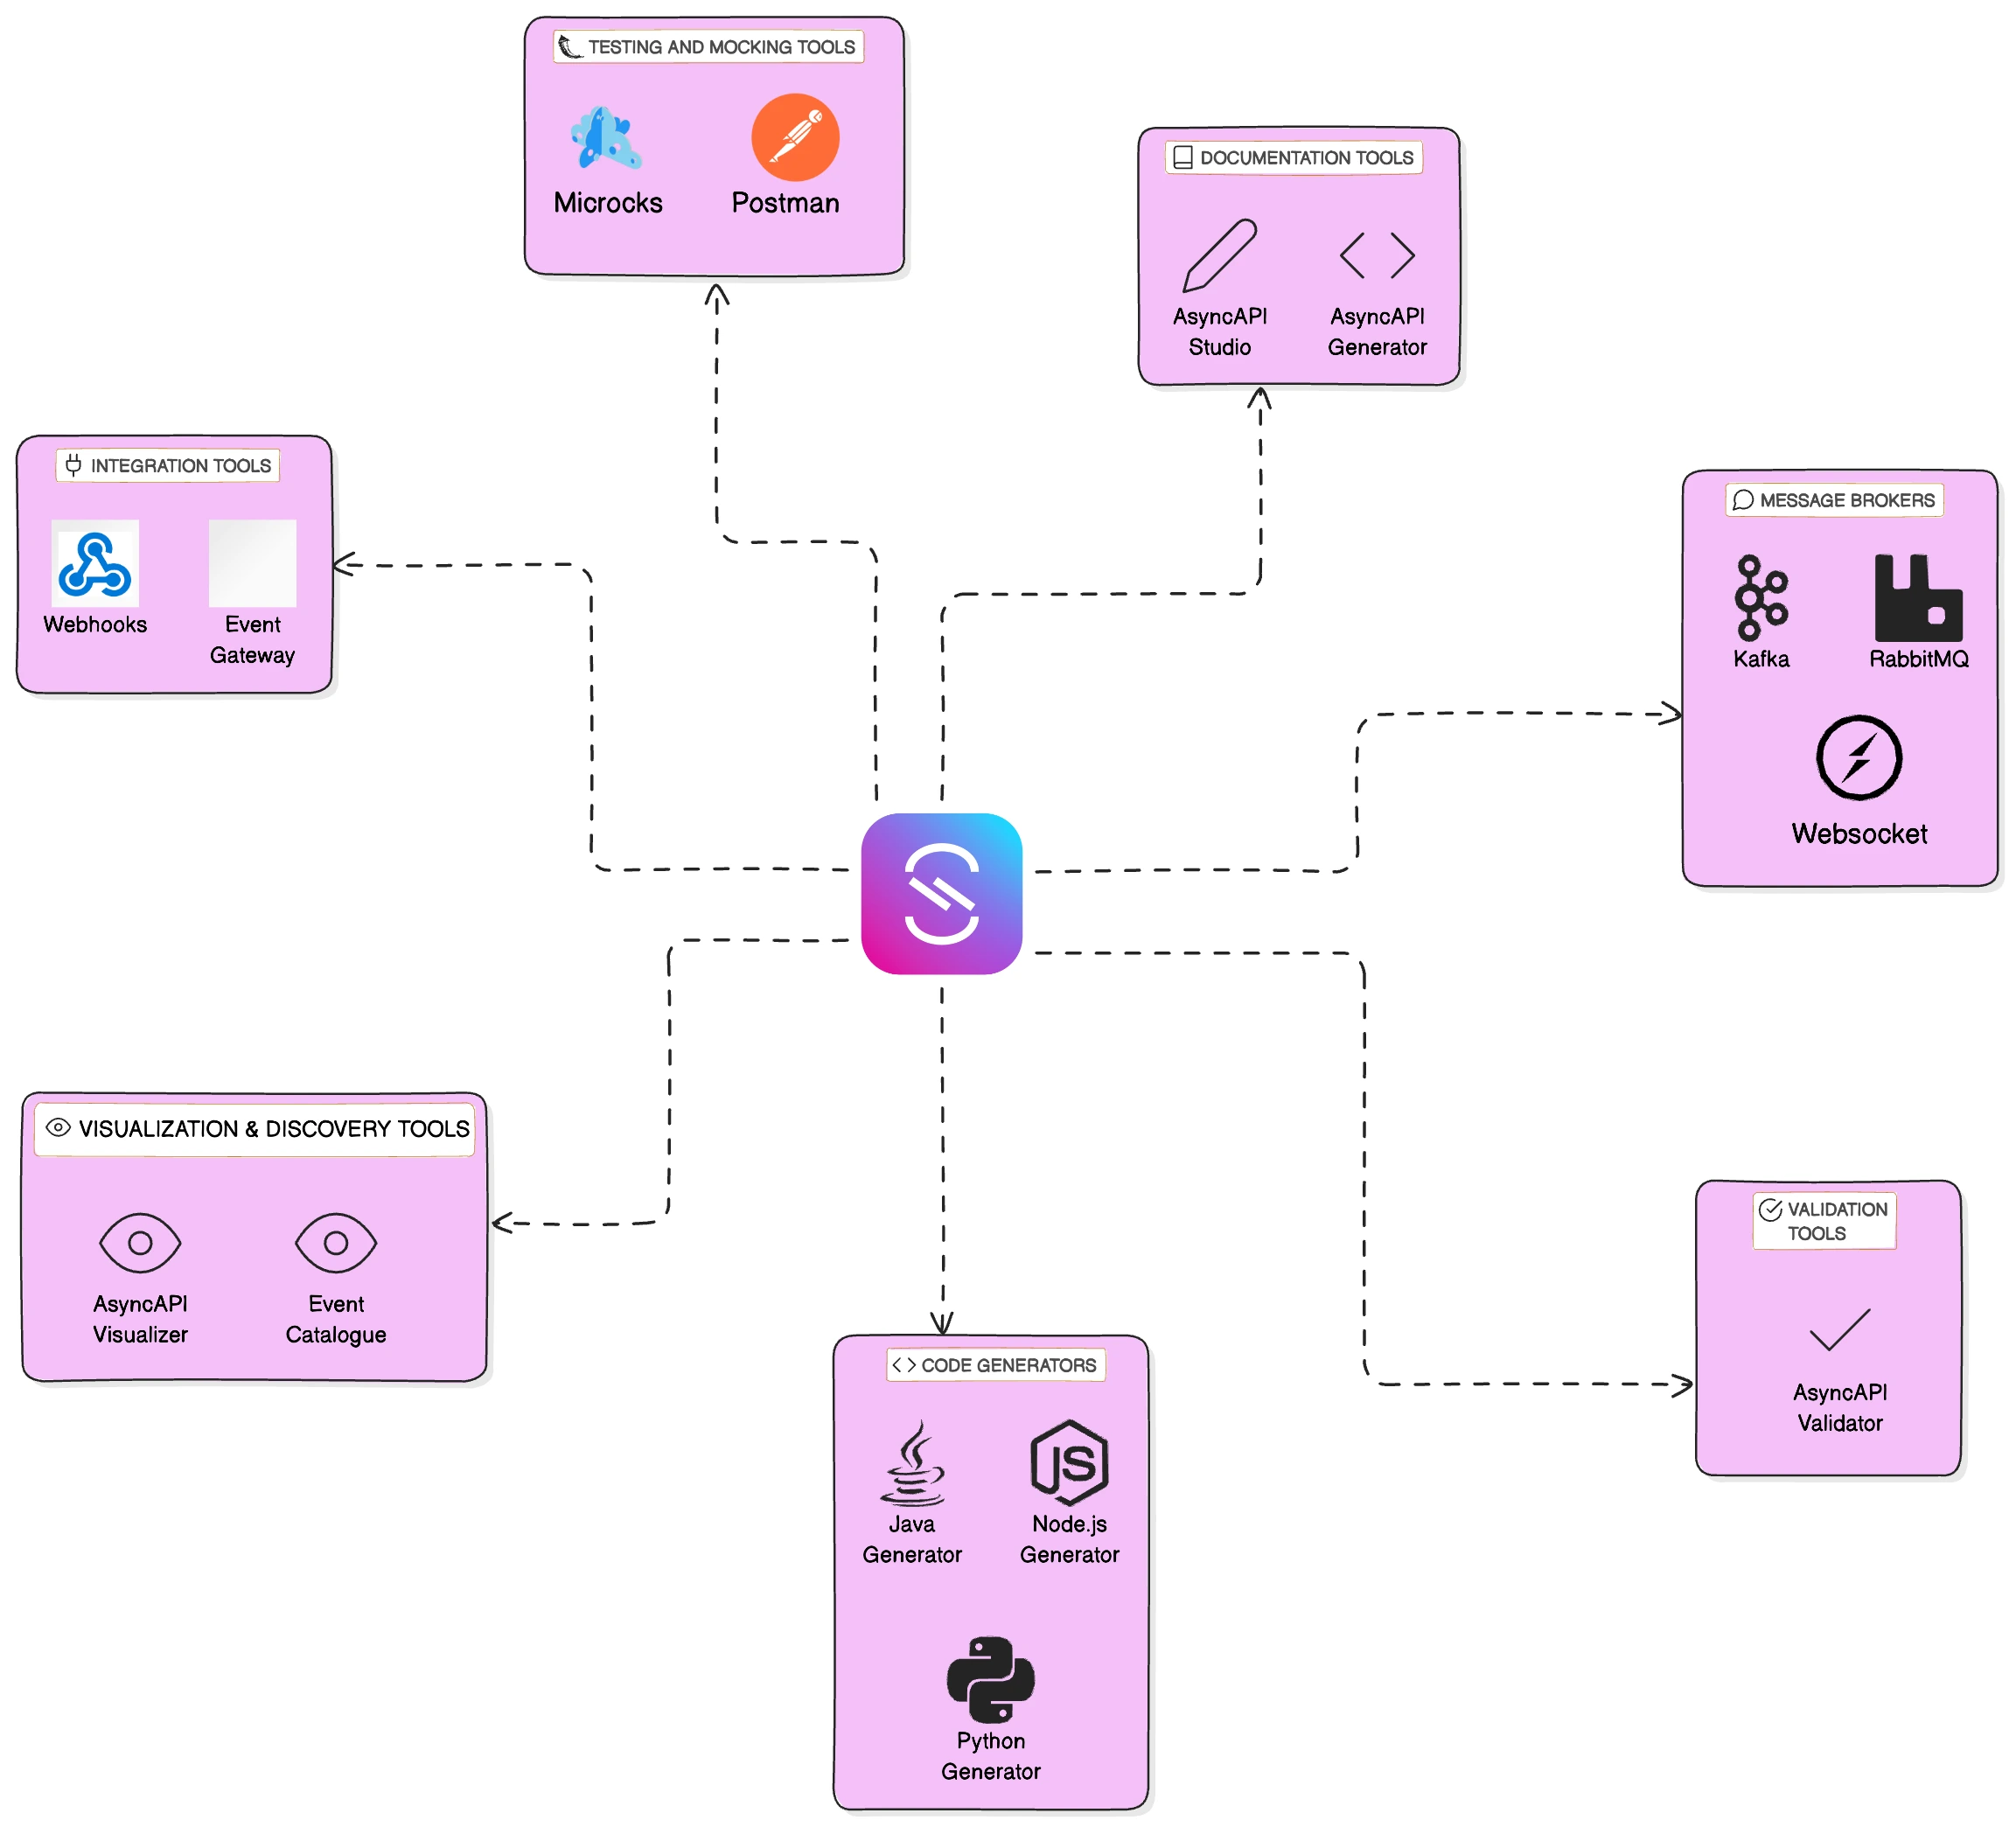
As the industry standard for defining asynchronous APIs, AsyncAPI unlocks a robust ecosystem of tools maintained by the AsyncAPI Initiative. You can generate production-ready code in multiple languages, create deployment-ready documentation automatically, and set up mock servers for development with tools like Microcks, all directly from your specification.
Now that you've seen the power of this approach, let's explore the key concepts in AsyncAPI for building WebSocket APIs.
Key Concepts in AsyncAPI for WebSocket
If you've used WebSocket before, you're likely familiar with channels, sometimes called topics or paths. Channels are specific routes within a WebSocket connection that organize how messages flow. For example, with channels named general and members, you can send and receive messages independently on each one. If you only want messages from the members channel, you simply listen to that channel and ignore the rest.
Channels
AsyncAPI channels establish bi-directional communication between message senders and receivers. They're more than just message highways, they're composed of several elements that work together:
- Address: An optional string specifying the channel's location (topic name, routing key, event type, or path)
- Title: A friendly, descriptive name for the channel
- Messages: The list of message types that can be sent and received on this channel
- Bindings: WebSocket-specific configuration that customizes connection details
Messages
In an event-driven system, data exchange is everything. AsyncAPI provides a structured, consistent way to define this exchange across WebSocket connections.
A message is the asset by which information flows between senders and receivers via channels. Messages are flexible and can represent events, commands, requests, or responses. Basically whatever your system needs.
Each message consists of:
- Name: A descriptive identifier for the message
- Summary: A brief overview of the message's purpose
- Description: Detailed explanation of what the message contains
- Payload: The structured properties and required fields for the message
Operations
An operation defines the specific actions that can occur within a channel, essentially telling you whether your application will send or receive messages. This clarity is crucial for understanding message flow.
Each operation includes:
- Action: Either
send(app sends a message) orreceive(app expects to receive a message) - Channel: The specific channel where the operation happens(from the list of defined channels in your AsyncAPI specification)
- Reply: Specifies the expected response message in request-reply operations (optional)
- Title: A descriptive name for the operation
- Summary: A quick overview of what the operation does
- Description: Detailed explanation of the operation's purpose
Together, these three concepts (Channels, Messages, Operations) give you complete control over message flow and make AsyncAPI a powerful tool for building scalable event-driven systems.
The Complete Breakdown
Now that we've explored the key concepts, let's build a complete AsyncAPI document for a simple chat application step by step.
Step 1 - Defining Basic Information About Our WebSocket API
First, we provide essential information about our API, including server details for client connections.
1asyncapi: "3.1.0"
2
3info:
4  title: Simple Chat API
5  version: 1.0.0
6  description: A real-time chat API using WebSocket protocol
7
8servers:
9  development:
10    host: localhost:8787
11    description: Development WebSocket broker
12    protocol: ws
Step 2 - Defining Our WebSocket Channel
AsyncAPI channels enable bidirectional communication. Let's define our chat channel:
1channels:
2  chat:
3    address: /
4    title: Chat channel
We'll define messages separately in components to keep the channel definition clean and reusable.
Step 3 - Creating Reusable Message Components
Components hold reusable objects for different aspects of your AsyncAPI specification. They only take effect when explicitly referenced elsewhere. Let's define our chat message:
1components:
2  messages:
3    chat:
4      description: A message sent in the chat room
5      payload:
6        type: object
7        properties:
8          messageId:
9            type: string
10            format: uuid
11            description: Unique identifier for the message
12          senderId:
13            type: string
14            description: ID of the user sending the message
15          content:
16            type: string
17            maxLength: 1000
18            description: The message content
19          timestamp:
20            type: string
21            format: date-time
22            description: Time when the message was sent
23        required:
24          - messageId
25          - senderId
26          - content
27          - timestamp
Step 4 - Adding Messages to Your Channel
Now link the component message to your channel:
1channels:
2  chat:
3    address: /
4    title: Chat channel
5    messages:
6      chatMessage:
7        $ref: '#/components/messages/chat'
Step 5 - Defining Operations
Operations specify what actions can happen in a channel. Let's create a send operation:
1operations:
2  sendMessage:
3    summary: Send a chat message
4    description: Allows users to send messages to the chat room
5    action: send
6    channel:
7      $ref: '#/channels/chat'
8    messages:
9      - $ref: '#/channels/chat/messages/chatMessage'
Important: The messages you reference in an operation must be available in that channel's messages. If you reference a message that doesn't exist in the channel, validation will fail.
Now add a receive operation so clients can receive messages:
1operations:
2  sendMessage:
3    # ... send operation from above
4
5  getMessage:
6    summary: Receive chat messages
7    description: Allows users to receive messages from the chat room
8    action: receive
9    channel:
10      $ref: '#/channels/chat'
11    messages:
12      - $ref: '#/channels/chat/messages/chatMessage'
Step 6 - Reusing Messages for Multiple Operations
Let's add user join/leave notifications. First, define a new message component:
1components:
2  messages:
3    chat:
4      # ... existing chat message
5    status:
6      description: User join/leave notification
7      payload:
8        type: object
9        properties:
10          userId:
11            type: string
12            description: ID of the user
13          type:
14            type: string
15            enum:
16              - join
17              - leave
18            description: Whether the user joined or left
19          timestamp:
20            type: string
21            format: date-time
22        required:
23          - userId
24          - type
25          - timestamp
Add this message to your channel:
1channels:
2  chat:
3    address: /
4    title: Chat channel
5    messages:
6      chatMessage:
7        $ref: '#/components/messages/chat'
8      userStatus:
9        $ref: '#/components/messages/status'
Then define operations that use the same message:
1operations:
2  sendMessage:
3    # ... existing operations
4
5  userJoin:
6    summary: User join notification
7    description: Notifies when a user joins the chat room
8    action: receive
9    channel:
10      $ref: '#/channels/chat'
11    messages:
12      - $ref: '#/channels/chat/messages/userStatus'
13
14  userLeave:
15    summary: User leave notification
16    description: Notifies when a user leaves the chat room
17    action: receive
18    channel:
19      $ref: '#/channels/chat'
20    messages:
21      - $ref: '#/channels/chat/messages/userStatus'
Both operations reuse the same userStatus message, reducing redundancy.
Step 7 - Securing Your API
AsyncAPI supports various security schemes (API Key, OAuth2, HTTP authentication, etc.). Let's add API key authentication:
1components:
2  securitySchemes:
3    apiKeyHeader:
4      type: httpApiKey
5      in: header
6      name: X-API-Key
7      description: API key passed in header
Apply the security scheme to your server:
1servers:
2  development:
3    host: localhost:8787
4    description: Development WebSocket broker
5    protocol: ws
6    security:
7      - $ref: '#/components/securitySchemes/apiKeyHeader'
The security property is an array because you can require multiple schemes, only one needs to be satisfied for authorization.
Step 8 - Adding Protocol-Specific Bindings
Bindings let you add WebSocket-specific configuration. For example, if you want users to connect to multiple chat rooms with a single connection, use query parameters instead of creating separate connections for each room:
1channels:
2  chat:
3    address: /
4    bindings:
5      ws:
6        query:
7          type: object
8          properties:
9            roomIds:
10              type: string
11              description: Comma-separated list of room IDs
12              pattern: ^[a-zA-Z0-9,-]+$
13          additionalProperties: false
Now users can connect once to /?roomIds=room1,room2,room3 and exchange messages across all rooms on a single connection.
Notice
additionalProperties: false, this ensures your system only accepts theroomIdsquery parameter and rejects any unexpected properties.
Step 9 - The Complete Document
Here's your finished AsyncAPI document bringing everything together:
1asyncapi: 3.1.0
2info:
3  title: Simple Chat API
4  version: 1.0.0
5  description: A real-time chat API using WebSocket protocol
6
7servers:
8  production:
9    host: chat.example.com
10    protocol: wss
11    description: Production server
12    security:
13      - $ref: '#/components/securitySchemes/apiKeyHeader'
14
15channels:
16  chat:
17    address: /
18    bindings:
19      ws:
20        query:
21          type: object
22          properties:
23            roomIds:
24              type: string
25              description: Comma-separated list of room IDs
26              pattern: ^[a-zA-Z0-9,-]+$
27          additionalProperties: false
28
29    messages:
30      chatMessage:
31        $ref: '#/components/messages/chat'
32      userStatus:
33        $ref: '#/components/messages/status'
34
35operations:
36  sendMessage:
37    action: send
38    channel:
39      $ref: '#/channels/chat'
40    messages:
41      - $ref: '#/channels/chat/messages/chatMessage'
42    summary: Send a chat message
43    description: Allows users to send messages to the chat room
44
45  getMessage:
46    action: receive
47    channel:
48      $ref: '#/channels/chat'
49    messages:
50      - $ref: '#/channels/chat/messages/chatMessage'
51    summary: Receive chat messages
52    description: Allows users to receive messages from the chat room
53
54  userJoin:
55    action: receive
56    channel:
57      $ref: '#/channels/chat'
58    messages:
59      - $ref: '#/channels/chat/messages/userStatus'
60    summary: User join notification
61    description: Notifies when a user joins the chat room
62
63  userLeave:
64    action: receive
65    channel:
66      $ref: '#/channels/chat'
67    messages:
68      - $ref: '#/channels/chat/messages/userStatus'
69    summary: User leave notification
70    description: Notifies when a user leaves the chat room
71
72components:
73  messages:
74    chat:
75      description: A message sent in the chat room
76      payload:
77        type: object
78        properties:
79          messageId:
80            type: string
81            format: uuid
82            description: Unique identifier for the message
83          senderId:
84            type: string
85            description: ID of the user sending the message
86          content:
87            type: string
88            maxLength: 1000
89            description: The message content
90          timestamp:
91            type: string
92            format: date-time
93            description: Time when the message was sent
94        required:
95          - messageId
96          - senderId
97          - content
98          - timestamp
99
100    status:
101      description: User join/leave notification
102      payload:
103        type: object
104        properties:
105          userId:
106            type: string
107            description: ID of the user
108          type:
109            type: string
110            enum:
111              - join
112              - leave
113          timestamp:
114            type: string
115            format: date-time
116        required:
117          - userId
118          - type
119          - timestamp
120
121  securitySchemes:
122    apiKeyHeader:
123      type: httpApiKey
124      in: header
125      name: X-API-Key
126      description: API key passed in header
What You Can Do With This Document
With your AsyncAPI specification complete, the spec-first approach unlocks powerful capabilities:
-
Generate Documentation: Tools like AsyncAPI Studio let you visualize and interact with your API definition in your browser. You can also generate and download markdown documentation or a deployable HTML website directly from your specification.
-
Generate Code: The AsyncAPI CLI transforms your specification into production-ready code in multiple languages. Generate client or server implementations, data models, and more, reducing development time and inconsistencies.
-
Contract Testing: Tools like Microcks let you test and mock your API directly from your specification, ensuring your implementation matches your design before going live.
Install the AsyncAPI CLI and try generating documentation with: asyncapi generate fromTemplate ./asyncapi.yaml @asyncapi/html-template@3.0.0 --use-new-generator
Or preview your specification live in AsyncAPI Studio.
Conclusion
Documenting your WebSocket API with AsyncAPI brings clarity and structure to API design and management. By standardizing message formats, channels, and operations, AsyncAPI simplifies building scalable, consistent, and reliable event-driven systems.
AsyncAPI's structured approach equips teams with a collaborative framework that enhances efficiency and reduces friction, making it essential in modern API development.
References
- Livestream: Building a chat application with AsyncAPI
- Blog post: WebSocket and AsyncAPI deep dive
- AsyncAPI Slack: Join the community